Main Courses
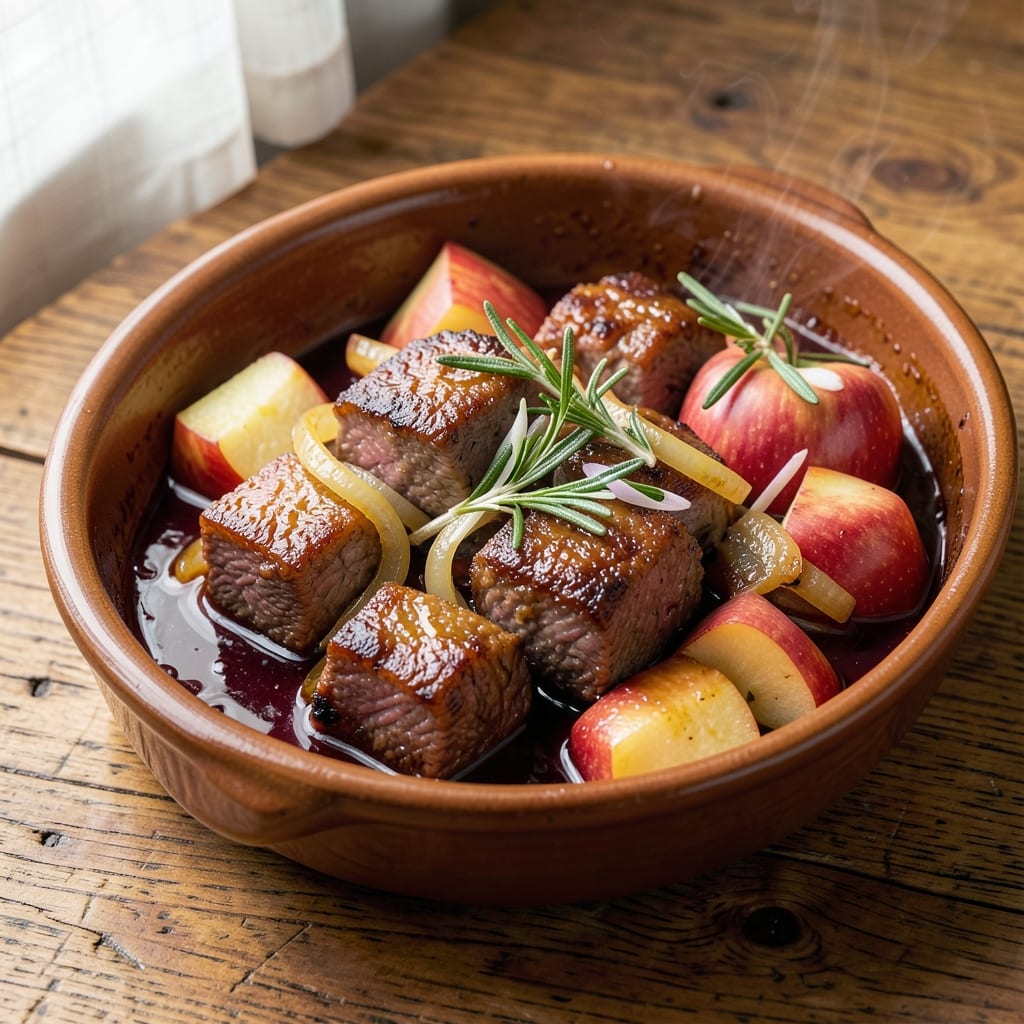
This apple beef recipe transforms tender beef into a rich, caramelized masterpiece with sweet apples and onions in one pot. The secret lies in slow cooking—where sweet and savory flavors meld into perfect harmony. I’ve perfected this method over years, ensuring the beef stays juicy while the apples soften into a luscious, slightly tangy addition.
The process begins with searing beef in a Dutch oven, then layering in onions and apples to caramelize slowly. A splash of red wine and beef broth deepens the sauce, while thyme and bay leaves add aromatic complexity. The result? A dish that’s hearty enough for a weeknight dinner but elegant enough for company—restaurant-quality without the fuss.
By the time you’re done, you’ll have fork-tender beef swimming in a glossy, slightly sweet sauce, with apples that add just the right balance of crunch and tenderness. Serve it over mashed potatoes or with crusty bread to soak up every last drop of that rich, caramelized goodness. The aroma alone will have everyone gathered at the table.
This recipe is designed for one-pot simplicity, making it ideal for busy weeknights or special occasions. The flavors only get better as they sit, so it’s perfect for meal prep or impressing guests. Let’s get cooking—your taste buds will thank you.
Ingredients for apple beef
Sweet apples and tender beef meet caramelized onions in this one-pot wonder.
| Ingredient | Amount | Notes |
|---|---|---|
| Beef Chuck Roast 🥩 | 2 lb | Cut into 1.5-inch cubes |
| Yellow Onions 🧅 | 2 whole | Thickly sliced, yellow or red |
| Apples 🍎 | 4 whole | Honeycrisp or Fuji, peeled/cored |
| Red Wine 🍷 | 1 cup | Bold dry variety like Cabernet |
| Beef Broth 💧 | 2 cups | Low-sodium preferred |
| Olive Oil 🫒 | 2 tbsp | Extra-virgin for richness |
| Fresh Thyme 🌿 | 2 sprigs | Or 1 tsp dried thyme |
| Bay Leaves 🌿 | 2 whole | Remove before serving |
| Garlic Cloves 🧄 | 4 cloves | Minced for depth |
| Brown Sugar 🍚 | 2 tbsp | Enhances caramelization |
| Salt 🧂 | 1 ½ tsp | Kosher or sea salt |
| Black Pepper 🌶️ | ½ tsp | Freshly ground preferred |
| All-Purpose Flour 🌾 | 1 tbsp | For thickening sauce |
The beef is everything here. Chuck roast stays juicy while it braises—sirloin or ribeye will dry out. Cut it into even chunks so it cooks uniformly. Costco or Walmart usually have it pre-cubed for convenience, but if you're buying a whole roast, ask the butcher to cut it for you. Apples should be firm and sweet—Honeycrisp or Fuji work best, but Granny Smith adds tartness if you prefer. Onions? Yellow or red, thickly sliced so they caramelize properly instead of turning to mush.
No red wine? Beef broth with 1 tbsp balsamic vinegar works in a pinch. Fresh thyme is ideal, but dried at one-third the amount saves time. The brown sugar might seem odd, but it's what turns that caramelized onion-apple mix into something magical. Coconut sugar is a 1:1 swap if you're avoiding refined sugar. For the flour, all-purpose works fine, but if you're gluten-free, swap for cornstarch. The garlic can be pre-minced from a jar if you're short on time—just don't tell anyone I said that.
This dish only gets better with time—3-4 hours on low heat is ideal. Leftovers keep for 5 days in the fridge, and it freezes beautifully for 3 months. I like to portion it into containers with a side of crusty bread so lunches are ready to grab. The sauce thickens as it cools, so add a splash of beef broth when reheating if it's too stiff. Trust me, the first bite out of the fridge is worth the wait.
Why You'll Love This Recipe
- Foolproof Prep: I swear by this one—just sear the chuck roast, toss in chopped onions and apples (no fancy peeling required), then let the slow cooker do the magic. The only real effort is slicing the apples, and even my 10-year-old could handle that.
- Sweet-Savory Magic: That first bite? The beef is tender, the apples add a bright crunch, and the red wine cuts through the richness like a perfect balance. Honestly, it’s the kind of dish that makes you want to take seconds before the table’s even cleared.
- Leftovers for Days: This recipe practically begs to be made in bulk—it reheats beautifully, and the flavors only get better after a night in the fridge. I’ve turned it into sandwiches, tacos, and even a quick stir-fry, and no one ever complains.
- Budget-Friendly Feast: A chuck roast stretches farther than you’d think, especially with onions and apples bulking up the dish. Between us, this is my go-to when I need to feed a crowd without breaking the bank—plus, the red wine and broth make it feel fancy without the price tag.
Step-by-step instructions for braised apples and caramelized onions in one pot
Transform tough beef chuck into tender, flavorful bites with sweet apples and onions.
Sear the Beef Chuck for Deep Flavor
Heat 2 tablespoons olive oil in a large Dutch oven over medium-high heat. Working in batches, add the 2 lb beef chuck roast cut into 1.5-inch cubes and sear for 3-4 minutes per side until deep golden brown. You're building flavor here—don't rush this step or the meat will steam instead of develop that rich crust.
As you sear, I like to press down gently on each piece with a wooden spoon for the first 10 seconds—this prevents curling and ensures even browning. Once all the beef is golden and caramelized, remove it from the pot and set aside on a plate. You'll notice the pot has those beautiful browned bits stuck to the bottom—that's pure flavor we'll dissolve later.
Caramelize Onions and Apples Until Golden
In the same Dutch oven, add the 2 whole yellow onions sliced thickly and the 4 whole apples peeled, cored, and cut into 1-inch chunks. Cook over medium heat for 10-12 minutes, stirring occasionally, until the onions soften and begin to turn golden. This is where that 2 tablespoons brown sugar comes into play—it enhances the caramelization process.
After 5 minutes of cooking, add the 4 cloves minced garlic, 2 sprigs fresh thyme, and 2 whole bay leaves. The garlic should sizzle gently and fill your kitchen with that irresistible aroma. Stir in the 1 cup red wine and scrape up all those browned bits from the bottom—this deglazing step captures all that beef flavor you worked so hard to develop earlier.
Simmer the Braise Until Tender
Pour in the 2 cups beef broth and bring everything to a gentle simmer. Return the seared beef to the pot, along with any accumulated juices. The liquid should come about halfway up the beef cubes. Season with 1.5 teaspoons salt and 0.5 teaspoon black pepper, then cover with a tight-fitting lid.
Transfer the pot to the oven and braise at 325°F for 2.5-3 hours until the beef is fork-tender. Here's the thing—you'll know it's ready when the meat falls apart easily with a fork and the sauce has thickened to a rich consistency. If the liquid reduces too quickly, add a splash of water or broth to maintain the proper braising liquid level.
Thicken the Sauce and Finish
Remove the pot from the oven and discard the 2 whole bay leaves. Increase heat to medium-high and let the braising liquid reduce slightly for 5-7 minutes until it coats the back of a spoon. Sprinkle the 1 tablespoon all-purpose flour over the mixture and stir vigorously for 1-2 minutes until the sauce thickens noticeably.
Taste and adjust seasoning if needed—you might want to add a pinch more salt or a splash of red wine to balance the flavors. The final dish should have tender beef cubes swimming in a rich, slightly sweet sauce with caramelized onions and apples. Serve immediately over mashed potatoes, crusty bread, or egg noodles to soak up every delicious bite.
Pro Tips For Making Apple Beef
- SEAR THE ROAST FIRST: I learned this the hard way—skipping the sear means flavor hiding in the sauce instead of the meat. Get that chuck roast screaming hot in a dry pan for 3-4 minutes per side until it’s deep brown, then deglaze with the red wine. That crust locks in juices and makes the final dish taste like you actually cooked it.
- PEEL AND CORE APPLES LAST: Apples soften fast in liquid, so don’t pre-chop them until you’re ready to add them to the pot. Toss them in just 15 minutes before the end—peeled, cored, and sliced into wedges—so they stay crisp enough to bite into. (Yes, even if you’re impatient like me.)
- DON’T SKIP THE BROTH REDUCTION: The first time I rushed this, the sauce was thin and watery. Simmer the beef broth down by half before adding it to the pot—just 10 minutes in a separate saucepan—so it thickens the sauce and adds depth. It’s the difference between "meh" and "wow" in every bite.
- USE COLD WINE FOR DEGLAZING: Pouring cold red wine over hot seared beef makes the sauce split and turn bitter. Let the pan cool slightly (just a minute) before adding the wine, then scrape up those browned bits. Your sauce will taste balanced, not like you’re drinking cooking wine. (And we all know the difference.)
Storing and reheating this apple beef
Refrigerator Storage
Let your apple beef braise cool to room temperature (about 1 hour) before transferring to airtight containers. I use glass Pyrex containers with tight-sealing lids—they preserve flavors better than plastic. Store at 40°F or below for up to 5 days, but honestly? The flavors deepen overnight, making it even more delicious for leftovers. 💛
Freezer Prep Tips
For freezing, portion the braise into quart-sized freezer bags—leave 1-inch headspace to prevent expansion cracks. Press out excess air to avoid freezer burn. Label with the date and freeze for up to 3 months. I like to freeze it with a side of mashed potatoes in separate bags for easy reheating. 🥶
Stovetop Reheating
This is my preferred method because it keeps the sauce velvety smooth. Transfer the braise to a pot over medium-low heat and add 2-3 tablespoons beef broth if the sauce looks too thick. Simmer uncovered for 10-15 minutes, stirring occasionally, until heated through (165°F internal temp). Taste and adjust seasoning—it often needs a pinch more salt after reheating. ✨
Microwave Safety
For quick reheating, transfer the braise to a microwave-safe dish and cover loosely with a microwave-safe lid. Heat on 50% power in 2-minute intervals, stirring between each, until hot throughout. Avoid full power—it can make the sauce break apart. Add a splash of broth if it looks dry. 🔥
Oven Refresh
Preheat your oven to 300°F. Transfer the braise to an oven-safe dish, cover with foil, and bake for 20-25 minutes
If your reheated sauce seems too thick, simply add 1-2 tablespoons beef broth and warm through. For extra richness, stir in 1 teaspoon butter or a splash of red wine. The apples and onions will soften slightly more, but that's okay—they'll still be delicious. Just avoid overcooking or they'll turn mushy. 🍎Sauce Rescue
Nutrition facts
Frequently asked questions
Can I use a different cut of beef for this recipe?
While chuck roast is ideal for its tenderness when braised, you can use brisket or short ribs instead. Avoid lean cuts like sirloin or filet mignon—they'll dry out. For tougher cuts, increase braising time by 30-45 minutes to ensure they become fork-tender.
What if I don't have red wine? Can I substitute?
Use 2 cups beef broth plus 1 tablespoon balsamic vinegar for depth. For extra richness, add 1 teaspoon soy sauce or 1/2 teaspoon Worcestershire sauce. If you have apple cider, swap the wine for 1 cup cider—it adds natural sweetness that pairs perfectly with the apples.
How do I prevent the apples from turning mushy?
Keep them whole or in 1-inch chunks and add them to the pot after searing the beef. This way, they cook gently in the liquid rather than directly on the heat. For extra firmness, use Granny Smith apples (their tartness holds up better) and reduce braising time by 15 minutes. Stirring occasionally also helps distribute heat evenly.
Is this dish kid-friendly? How can I make it milder?
Yes! Kids often love the sweet apples, but you can adjust flavors. Skip the red wine and use extra beef broth instead. Reduce salt to 1 teaspoon and omit the thyme/bay leaves. For a sweeter touch, add 1 extra apple or a pinch of cinnamon. Serve with buttered noodles or mashed potatoes to make it more approachable.
Can I make this in a slow cooker?
Sear the beef as directed, then transfer everything to a 6-quart slow cooker. Cook on LOW for 7-8 hours or HIGH for 4-5 hours until beef is tender. The slow cooker method is hands-off and perfect for busy days. The sauce may be thinner, so reduce it on the stovetop afterward if needed.