
Main Courses
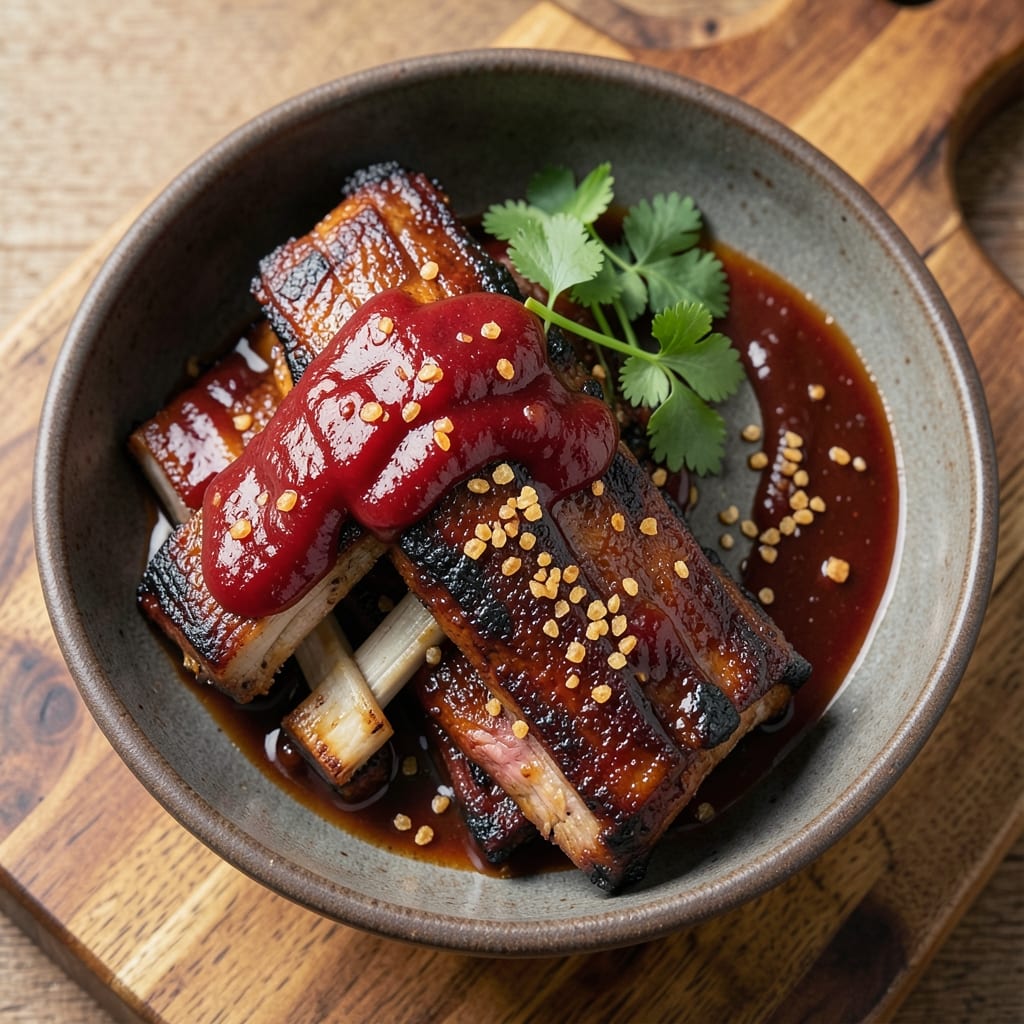
Barbecue beef back ribs transform a simple cut of meat into a masterpiece of texture and flavor—crispy bark that cracks with every bite, tender meat that falls off the bone, and a sauce that ties it all together. I've been perfecting this technique since my first backyard cookout, where the smell of hickory smoke became my culinary obsession. The 3-2-1 method isn't just a technique; it's a ritual that turns tough cuts into melt-in-your-mouth perfection.
What makes these ribs truly special is the balance between tradition and modern convenience. You'll start with a dry rub that develops a deep, caramelized bark, then slow-cook the ribs until they're fork-tender. The key lies in patience—low and slow is the only way to achieve that signature tenderness without sacrificing flavor. I've tested countless variations, and this method consistently delivers restaurant-quality results every time.
The final touch comes when you glaze the ribs with a tangy-sweet barbecue sauce, basting them until they develop that signature sticky glaze. The contrast between the crispy exterior and tender interior is what makes these ribs unforgettable. Serve them family-style with pickles, coleslaw, and cornbread for the full experience—each bite is a celebration of smoke, spice, and technique.
Whether you're cooking for a crowd or treating yourself to a Sunday feast, these ribs are worth the effort. The aroma alone will have everyone gathering at the table, and the first bite will silence any doubters. Let's get started on creating ribs that will become your new signature dish.
Ingredients for barbecue beef back ribs
The perfect balance of smoky bark and tender beef transforms backyard cookouts into unforgettable feasts.
| Ingredient | Amount | Notes |
|---|---|---|
| Beef Back Ribs 🍖 | 4 lb | Bone-in, meaty sections preferred |
| Yellow Mustard 🍯 | ¼ cup | For initial coating and flavor base |
| Brown Sugar 🍚 | ½ cup | Light or dark variety works |
| Smoked Paprika 🌶️ | 2 tbsp | For deep smoky flavor |
| Chili Powder 🌶️ | 1 ½ tbsp | Medium heat preferred |
| Garlic Powder 🧄 | 1 tbsp | Freshly ground for best flavor |
| Onion Powder 🧅 | 1 tbsp | For sweet depth |
| Ground Black Pepper 🌶️ | 1 tbsp | Freshly cracked preferred |
| Kosher Salt 🧂 | 1 ½ tbsp | Diamond Crystal preferred |
| Hickory Wood Chips 🌳 | 1 package | For authentic smoke flavor |
| Apple Cider Vinegar 🍎 | ¼ cup | For tangy balance |
| Barbecue Sauce 🍅 | 1 ½ cups | Tangy-sweet variety preferred |
| Butter 🧈 | ¼ cup | Unsalted, for basting |
| Fresh Rosemary 🌿 | ¼ cup | Chopped, for aromatic touch |
Start with the ribs—the meaty sections are what you want, not the bone-heavy ends. Costco or local butchers usually have the best cuts, but most grocery stores carry them too. Look for good marbling—this means more flavor and juiciness. If you can't find beef back ribs, pork baby backs work in a pinch, but the beef has that richer, deeper flavor that holds up to the long cook. The wood chips are non-negotiable for that authentic hickory smoke—Traeger or Smokey Mountain brands are my go-to, but any quality chips will do. Fresh rosemary is ideal, but dried works at half the amount if you're in a hurry.
No yellow mustard? Dijon or whole-grain mustard works just as well—just add a splash of water to thin it if needed. The brown sugar can be swapped for maple syrup or molasses for a different depth of flavor. If you're avoiding sugar entirely, use monk fruit sweetener at half the amount. The barbecue sauce is where you can get creative—Sweet Baby Ray's for classic tangy-sweet, or Stubb's Original for a more vinegar-forward profile. For the dry rub, if you can't find smoked paprika, a mix of regular paprika and liquid smoke (just a teaspoon) gets you close. The butter for basting? Full-fat is a must—low-fat won't give you that rich, glossy finish.
Store your dry rub in an airtight container for up to 3 months—it only gets better with age. The ribs themselves reheat beautifully—wrap them in foil and bake at 300°F for about 20 minutes to revive that tender texture. For leftovers, portion them into containers with some of the sauce and store for 4-5 days. Freeze extras for up to 3 months—just thaw overnight in the fridge before reheating. The sauce and wood chips can be prepped ahead, but the fresh rosemary is best added just before serving for maximum aroma.
Why You'll Love This Recipe
- Foolproof Prep: I swear by this—just slather the ribs with yellow mustard and brown sugar mix, then sprinkle the spices. No fancy marinating, no stressing over timing. Honestly, the hardest part is deciding whether to bake or grill them.
- Sweet-Smoky Magic: That combo of smoked paprika and chili powder? It’s like a hug for your taste buds. The brown sugar caramelizes into this sticky, glossy glaze that makes every bite irresistible—crispy edges, tender meat, and just enough heat to keep things interesting.
- Weekend Feast Ready: Between us, these ribs are my go-to for game day, potlucks, or lazy Sundays. They feed a crowd but don’t require you to slave over a smoker—perfect when you want impressive food without the fuss.
- Leftovers That Don’t Suck: I make a full rack, eat half, and the rest? Still amazing the next day. Shred them for tacos, sandwiches, or even a quick fried rice—no one will guess they’re not fresh off the grill. Budget-friendly, too, since beef ribs stretch farther than you’d think.
Step-by-step instructions for smoky, crackling beef back ribs
Here's how to transform tough beef ribs into melt-in-your-mouth perfection with a bark so crisp it shatters when you pull them from the smoker.
Prepare the Ribs with a Flavor-Packed Coating
Start by removing the beef back ribs from the package and patting them completely dry with paper towels. This drying step is crucial—it helps the rub adhere and promotes that coveted crispy bark. In a large bowl, combine the 0.25 cup yellow mustard, 0.5 cup brown sugar, 2 tbsp smoked paprika, 1.5 tbsp chili powder, 1 tbsp garlic powder, 1 tbsp onion powder, 1 tbsp ground black pepper, and 1.5 tbsp kosher salt. Mix until the sugar dissolves and the spices are evenly distributed.
Generously coat each rib with this mixture, pressing it into the meat so it penetrates the surface. I like to use my fingers for this—it helps the rub stick better than just sprinkling. Place the coated ribs on a wire rack set over a baking sheet and let them sit at room temperature for 30 minutes before smoking. This resting period allows the flavors to meld and the meat to come up to temperature more evenly.
Set Up Your Smoker for Low-and-Slow Cooking
While the ribs rest, prepare your smoker by adding the 1 package hickory wood chips to the smoke box. Preheat the smoker to 225°F—this low temperature is key for tenderizing the tough connective tissue in the ribs. I've found that maintaining this temperature gives you that perfect balance of smoke flavor without drying out the meat.
Once the smoker reaches temperature and you see clean, blue smoke (not thick white steam), place the ribs bone-side down on the smoker grates. This orientation allows the meat to render fat and develop that beautiful bark on the bone side first. Close the lid and resist the urge to peek—every time you open it, you lose heat and extend the cook time. Let the ribs smoke undisturbed for 2 hours.
Add Liquid and Continue Cooking Until Fork-Tender
After 2 hours, it's time to add moisture to the cook. This is where the 0.25 cup apple cider vinegar comes into play. Pour it directly onto the ribs, then close the lid again. The acidity in the vinegar helps tenderize the meat while adding a subtle tang that cuts through the richness of the ribs. Let the ribs continue cooking for another 2 hours, or until they reach an internal temperature of 195°F and are fork-tender.
You'll know they're ready when the meat pulls away from the bones with just a gentle tug and the connective tissue has broken down into a silky, almost gelatinous texture. This low-and-slow process is what transforms tough beef into melt-in-your-mouth perfection. The ribs should have a deep mahogany color and a glossy sheen from the rendered fats.
Build the Sauce and Finish with a Crispy Bark
Once the ribs are fork-tender, remove them from the smoker and transfer them to a large oven-safe dish. In a small saucepan, combine the 1.5 cups barbecue sauce, 0.25 cup butter, and 0.25 cup chopped fresh rosemary. Simmer over medium heat for 5 minutes until the sauce thickens slightly and the rosemary releases its aromatic oils.
Brush this sauce generously over the ribs, then return them to the smoker. Increase the temperature to 275°F and smoke for another 30-45 minutes, basting with additional sauce every 15 minutes. This final step is what creates that coveted bark—a dark, crispy crust that shatters with every bite. The ribs are done when they reach an internal temperature of 203°F and the bark is deep mahogany in color.
Rest and Serve with Confidence
Remove the ribs from the smoker and let them rest for 15-20 minutes before serving. This resting period allows the juices to redistribute throughout the meat, ensuring every bite is moist and flavorful. During this time, you can tent the ribs loosely with foil to keep them warm.
To serve, pull the ribs apart at the bone joints and arrange them on a platter. The meat should fall away from the bones effortlessly, and each bite should deliver a perfect balance of smoky, sweet, and tangy flavors. Serve with extra barbecue sauce on the side and a crisp green salad to cut through the richness. These ribs are a showstopper—crispy, tender, and packed with flavor that will have everyone asking for seconds.
Pro Tips For Making Barbecue Beef Back Ribs
- Trim the Silver Skin: That thin, papery membrane on the bone side? It’s the reason your ribs stay tough. Use a butter knife to peel it off—start at the bone, slide under it, and lift. I used to skip this and wondered why my ribs never fell apart, even after hours in the smoker. ---
- Mix Mustard Last: Brown sugar and spices clump like glue when wet. Whisk them dry first, then stir in the yellow mustard right before applying. I learned this the hard way—lumpy sauce on ribs is a nightmare to fix mid-cook. ---
- Wrap at 170°F: Don’t rush the wrap—wait until the probe hits 170°F internal temp. Foil too early, and you’ll end up with steamed ribs instead of tender, caramelized meat. Low and slow until then; the last hour is where the magic happens. ---
- Spritz with Apple Cider: Skip the store-bought spray and use a 50/50 mix of apple cider vinegar and water every 90 minutes. The acid cuts through the sugar crust, keeps the ribs moist, and adds a bright finish. (Yes, even if you’re not a fan of vinegar—trust me.)
Essential equipment for great barbecue beef back ribs
Smoker Essentials
You don't need a fancy smoker to make these ribs—just something reliable that maintains 225°F consistently. I swear by my Traeger Pro 575 for its even heat distribution, but a Weber Smokey Mountain or even a charcoal grill with a water pan works in a pinch. The key is temperature control—fluctuations ruin the tenderizing process. 🌡️
For wood, stick with hickory chips—they're the gold standard for beef ribs. I buy mine in bulk from Traeger's website or my local Costco to save money. Soak them for 30 minutes before use if your smoker runs dry, but most modern smokers handle them fine straight from the bag. Pro tip: Keep a backup bag handy—running out mid-cook is a heartbreaker.
Temperature Tools
A meat thermometer isn't optional—it's non-negotiable. I use a ThermoWorks Smoke because it's waterproof and has dual probes, but even a basic Thermoworks Anywhere will do. The probe should go into the thickest part of the meat, avoiding bone. 195°F is your target for tender ribs, but don't stop there—push to 203°F for that perfect bark. 💡
For monitoring smoker temps, I recommend a separate probe or a digital thermometer with a remote sensor. The Meater+ is my go-to because it tracks both smoker and meat temps simultaneously. If you're on a budget, the Thermoworks Smoke with its built-in smoker probe works wonders for under $50.
Heat Management
Your smoker's heat source matters—electric smokers are easiest for beginners, while charcoal smokers give you more control over smoke levels. I love my Traeger for its set-and-forget convenience, but nothing beats the hands-on experience of a charcoal smoker like the Masterbuilt 20071111. For charcoal, use lump charcoal and a chimney starter—it's the only way to get consistent coals without flare-ups. 🔥
No matter your setup, heat shields are a game-changer. They protect the ribs from direct heat and help maintain that crucial 225°F temperature. I use ceramic heat deflectors from Traeger, but you can DIY with cast iron grates or even aluminum foil in a pinch. Just don't let them touch the ribs directly—you want indirect heat for even cooking.
Basting Supplies
The final sauce application requires the right tools. A silicon baster brush is my secret weapon—it holds more sauce than a regular brush and won't leave bristle marks. I keep one in my smoker toolkit at all times. For the sauce itself, a small saucepan with a handle you can grip while smoking is essential. I use a 3-quart stainless steel saucepan because it heats evenly and won't warp. 🍯
Don't forget tongs for flipping and heat-resistant gloves—you'll be handling hot ribs and saucy pans. I swear by Oregon Ball jars for storing extra sauce between uses. They stack neatly in my pantry and keep everything fresh. A small spray bottle with water also comes in handy if your smoker runs dry mid-cook.
Nutrition facts
Frequently asked questions
Can I use pork ribs instead of beef ribs for this recipe?
The technique works for both, but beef ribs require the longer cook time to tenderize their tougher connective tissue. Pork baby backs will finish faster—aim for 2-2.5 hours total at 225°F instead of the 4-5 hours needed for beef. The bark will form quicker on pork, so watch closely during the final 275°F stage to avoid burning.
Why does my bark keep falling off instead of staying crisp?
This usually happens when the ribs aren't dry enough before applying the rub or if the smoker temperature fluctuates too much. Pat the ribs completely dry with paper towels and let them sit uncovered for 30 minutes before smoking. Also, maintain that 225°F temperature like a hawk—even small drops can cause the bark to soften. A light spray of apple cider vinegar before the final sauce application can help seal it.
What's the best way to reheat leftover beef back ribs?
Wrap ribs tightly in foil and reheat in a 300°F oven for 20-25 minutes until warmed through. For extra crispiness, broil for 2-3 minutes at the end. Avoid microwaving—it turns the bark mushy. Pro tip: Store ribs with some of their sauce to keep them moist. They reheat beautifully for 4-5 days in the fridge or 3 months frozen.
Can I make these ribs in an oven without a smoker?
Use a low-and-slow oven method by placing ribs on a rack over a baking sheet with 1 inch of water. Cook at 225°F for 4-5 hours, adding apple cider vinegar after 2 hours. For smoke flavor, add 1-2 soaked wood chips to the water or use a smoke tube with hickory chips. The final sauce stage works the same at 275°F.
How do I know when the ribs are truly done?
Use the fork test: When you insert a fork into the meat near the bone, it should slide in with minimal resistance and the meat should pull away cleanly. The internal temperature should read 203°F at the thickest part. The connective tissue should look glossy and translucent, almost like jelly. If they're not there yet, keep them going—beef ribs need that extra time to reach perfection.